Wednesday, August 20, 2008

The Launch... on a cold January day...


I was expecting a brass band or maybe even a bagpipe to celebrate the big launch day... alas, the only folks to go with me were my good friends Jeff the cabinetmaker and Eric the financial manager... Jeff was the guy who allowed me to erect the tent on his property and Eric is an experienced boater who built a Devlin designed boat as well...  Eric brought the camera.

We jumped in the boat and off we went.  I assumed we'd go around the little harbor, but we left the harbor and kept going.  We eventually landed on an island about 4 miles away and as you can see by the pics, there was a lot of ice around.  Keep in mind, this is all salt water so ice on the ocean means very very cold. 

Jeff was miserably cold, Eric had a blast driving the boat and I was a nervous wreck hoping to God that the boat would hold together because humans last only about 15 minutes in ice cold water and believe me we were the only ones on the water that day.  

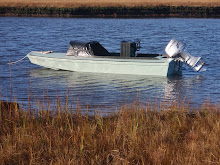
Note, the boat only draws about 6-7 inches and is bouyant.  I've poled into small streams and shallow marshes with ease.  It's a versatile design.  It has utilitarian looks and for good reason, it's utilitarian ; ).

Everything turned out well and the boat exceeded my expectations in terms of handling and speed.  It turns in it's own length and pops right out of the water and steps up on plane nicely... We had a great time.

Next... a new paint job, a more civilianized version + the addition of a helm with wheel...

More Finish Work... this is the hardest part... because once you think you're done... you're not


Here are a few pics... the first reveals the motor, a 40 hp 4 stroke Honda... I ordered the tiller as I wanted maximum room in the cockpit for duck hunting.  It's a great motor - quiet, smoke-free and terrific gas mileage.

The second pic shows the stainless steel plate a friend of mine made for me.  The rubber piece on the trailer stop started to sand away at the fiberglass covered wood, ergo the plate.   Salt would dry and the rubber piece would act as sandpaper... The plate worked.  

The final pic shows the gas shelf complete.  Note the anchor fits snuggly underneath.  After 5 years of motoring I have never heard the anchor noise typical of small boats in big waves...

Friday, August 15, 2008

Tent gives out due to snow... time to bring her inside...


Fortunately my brother in law, the factory owner, felt sorry for me as my cheap tent was giving up the ghost after months of rain and wind.  I bought a boat trailer and moved the boat to a factory near Hartford, CT... and for a month, I drove to the factory almost every night to finish the boat.  The factory was an hour and a half away - a true labor of love... but I had to get this boat finished.  I'm impatient by nature, which is boat building's greatest enemy I discovered.  There is no room for impatience in this activity... 

In these pics you'll see the boat after decking and initial painting.  Electrical system was installed, the battery was mounted on the battery platform, the gas tank was ready for the "gas shelf" and my butt was ready for the "ass shelf" - all finished at this stage... I invented all of these mods, as they were not in the plans and after 5 years of running the boat, they proved successful (if I do say so myself ; )...  but that's half the fun of building a boat - you can explore and if it stinks, rip it out and start over.

More Inside Carpentry... a satisfying step...

A nice piece of meranti was added to the top of the unfinished floatation chamber... I didn't want the decking to oil-can, plus, I wanted a good grounding area for the eventual cleats.  

A farmer friend of mine gave me a 100 + year old Scythe handle to be used as a poor man's center console... Thankfully the boat is extremely well balanced in our wavy bay here in Rhode Island, i.e. the pilot stands at the pivot point.  Nonetheless, the scythe adds a strong sense of security as I drive the boat standing up.  

Next to last pic is of the hull-throughs and finally the whole boat prior to decking.


Inside Fairing, and Carpentry...


Sunday, August 3, 2008

Time to get the pals back... Donut budget is shot. Flipped again. Why "Fairing" is really UNfair.


Hull is "faired" and painted, boat is flipped for the last time... and brought back to the cradle... 

What is "fairing" ?, it's a system of filling holes, imperfections and divots and sanding, filling the same imperfections again, then sanding, and then filling the same imperfections again, and so on.  I don't know why they call it "fairing", it's actually quite unfair ; ).  I made a decision at this point to spend the time necessary to make a boat that I am proud of.  I wanted it to look like it popped out of a mold.  Which is perverse.  Make a wooden boat that looks -- well -- plastic...  what a world.  My wife informed me at this stage that she is burying me in the stupid thing, so I may as well have something I'm proud of for all eternity.

After the boat is turned, it's time to fair the inside.  The red stuff you see is an extremely light powdery substance called "microballoons" which is mixed with epoxy.  It's tough stuff, but at the same time, it's easy to sand.  Up to this point I used a maple wood flour (the brown stuff) mixed with epoxy.  It's extremely hard to sand.  Only a random orbital sander is effective against maple wood flour.  All other sanding techniques (vibrating, by-hand) are much, much harder.  

Fiberglass is done... now sacrificial keels and "wedges" are applied


I'll admit, I thought fiberglassing was going to fun.  It was hard.  I applied the fiberglass "dry"... meaning I draped the cloth and then pushed the epoxy through the cloth.  Awful.  It took forever.  Many people swear by the dry method, I thought it was a drag.  It was perhaps the Xynol cloth that I used.  The second layer went on much easier.

I then mounted (3) doug fir pieces on the hull.  One in the center and two outboards.  I followed it up with brass "half rounds" to protect the doug fir keel pieces.  Note:  I wish I had used mahogany instead of doug fir.  Doug fir is too soft.  It's been 5 years since the hull was finished and the bottom has held up amazingly well.  I take care of this boat, I baby it actually.  However, I use it for duck hunting in the winter and I am constantly rubbing against rocks, shells and sand on the bottom.  It can't be helped.  

The only real damage I have done to the bottom - and it's cosmetic damage - was a bad (too short) roller on the trailer... it had this metal hat on the end of a metal shaft that would roll along the center keel and damage it.  I have since replaced that roller and the problem has disappeared. 

The Snow Goose design has a history of porpoising... which means that when the boat is underway, the bow slaps rhythmically rises and falls - it's annoying.  With this knowledge, I applied wooden wedges on the bottom of the boat near the transom.  Wedges act like a "trim" on an airplane's aileron.  the wedge pushes the bow down and keeps the bow in trim.

Some say it slows the boat down and in some cases is unsafe - as it is hard to get the bow up in big wave situations.  This boat has seen a lot of big water and I can get the boat pointed up no problem at slow speeds - i.e. the wedges are NOT unsafe.  They may slow the boat some, but for my use, the boat goes plenty fast.  

Nice bottom ...


Time to flip.  If you decide to build a boat, you'll discover that beer and donuts are two hugely important tools in your toolbox because that's what you'll need for the volunteers when it's time to flip the boat.   Time start work on the hull...

I wish I had the proverbial middle aged men flipping their neighbor's boat pic, but I don't.  One of my regrets is that I don't have enough pics.  I do remember that I invited about 8 guys over to help me.  The oldest one, Floyd, one of my best friends and a full time senior citizen curmudgeon, interrupted me while I was barking instructions and reviewing all the safety rules... and said "Andrew if you're done with all that yapping, I'd like to hurry up and get this thing flipped because I have things to do..." And with that said, all lifted the boat off the cradle, brought it out of the tent, flipped it and zipped it back into the tent... With 8 of us, the boat was ridiculously light...

That was in 2003, flash forward to this past Spring (2008) when I decided to flip the boat to do some painting on the bottom... Floyd was there, he had aged by 5 years (he's 75 now) and I had only invited 5 guys + me... Well, the boat was a great deal heavier this time around and the boat lifters were all a great deal older and chubbier... Floyd interrupted me again as I was giving an extremely organized and articulate safety speech and he was impatient again and he lifted and we all had to lift with him. He looked distressed as he discovered it was a great deal harder this time around...and we all moved around to help him... Thank God he didn't get hurt, but it couldn't have happened to a nicer guy...; )

Anyway... here is the boat in all it's bottom glory.  This stage is enjoyable... the chines (where the hull and sides of the boat meet) are radiused (smoothed round) using a vibrating sander and a random orbital.  The entire hull is given an 80 grit etch all over in order to get ready for fiberglassing.  Fiberglass comes in different types (extremely strong and expensive such as kevlar to "normal" cloth that's plenty strong and far cheaper), I chose a Xynole as my first layer, and a layer of good old 10 oz "normal" cloth as my second hull layer.  The sides only received one layer of Xynole.  I applied a layer of 6" tape along the edges before the hull and sides were draped.

Fiberglassing a wooden boat adds abrasion protection (shells, rocks, sand, etc.).  It does not add structural strength.  This is a light boat - about 400-450 lbs empty, it has plenty of abrasion protection.

The floor gets fillet'd as well...


A few notes here...  I decided to fillet the floor in, which provided a "truss" effect from a boat strength perspective.  In the earlier, pre-floor pics, you'll see the bilge full of stringers.  The floor (1/2" meranti ply) is glued and screwed directly onto the middle keel piece and the stringers.  Then the floor is fillet'd along the edges.  

The boat has a true bilge where the water ends up after rainstorms and wet passengers getting in and out of the boat - the 4 legged kind as well as the 2 legged.  

I installed (3) deck plates in the floor for bilge access to remove dirt and debris.  The deck plates are the "pop up" type, as opposed to the screw-in... the screw type invites dirt, etc. and is hard to turn.  I carry a tiny crow bar to help pop the deck plates out and I stomp on them to put them back in.  I remove the plates after every launch to allow the bilge to dry out.

Several boat builders add foam in their bilges.   I think this is a mistake from three perspectives.  It looks good on paper, i.e. more floatation = greater safety in a spill, however I believe it adds a huge disadvantage in running in bad weather as the water is at a higher center of gravity (above the floatation).  Second, the boat would tend to turtle in the event of a capsize and instead of sitting in a wet boat and waiting for a rescue, one could find himself sitting in the water.  Finally, moisture will migrate to the wood between the floatation and the lack of air will promote rot... and get heavy, etc...