Saturday, July 19, 2008

Fillet... no not steak.


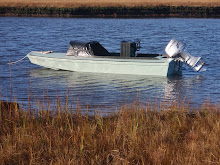
A fillet is actually a big cove of epoxy mixed with wooden flour (think finely ground sawdust)... it makes a paste.  The paste, the consistency of peanut butter, is coved in between where the bulkheads meet the hull and the sides and where the sides meet the hull... basically wherever wood meets wood, you'll need to put in a fillet.  That's what holds the boat together.

Epoxy is stronger than the wood itself and at first I was skeptical.   It's better than screws because it doesn't rust.  Incredible stuff.  See the dark coves of epoxy where wood meets wood.  This stage is time consuming as layers of fiberglass tape are placed over the epoxy/wood flour mix.  

Beginners like me tend to overdo it.  In other words, my fillets were thick - too thick I discovered, so I spent a lot of money on epoxy and I didn't need to.  Well, this boat is built strong.

Note the goofball pic... I'll never forget this day... my son asked me "Dad, wouldn't it have been easier to have just bought a boat?"... and I replied that Dad had always wanted to build a boat and that this was one of life's great adventures... on the other hand, I was consumed with getting this boat done before duck hunting season and since I am the most impatient person alive, this process didn't seam fair ; )  Guess what, building a boat is NOT for the impatient.  I learned that lesson early on.  

I changed my attitude at this stage and decided that I was going to take my time and do it right.  After all, it truly is a once in a lifetime thing to do...

Progress is swift now... I figured I'd be done in a month...


Nuthin' doin'... if you've ever built a house or watched a building go up... the framing stage is always the most exciting and the quickest.  Little did I know that I was not even half way done yet...

Here you can see pics of the skin together and the bulkheads placed inside the boat.  Bulkheads are the pieces on the ends and in the middle... The bulkheads are thicker than the outside skin.  Bulkheads are 3/4" (the skin is 3/8ths).  The design is cool, it's really an exoskeleton.  In other words, the boat's strength is in its skin - not unlike an airplane or lobster.  

The boards put on the top sides are called "clamps", not to be confused with the actual metal clamps holding the "clamps" on as seen in the pics... I don't know why they call the boards clamps but they serve an important purpose in terms of boat shape and strength.  I've also discovered that they come in handy when crashing into a dock... that's the beauty of wooden boats, they can be fixed and painted ; )

The floor (or "sole" in nautical parlance) is in at this stage.  The sole ply is 1/2" thick.  

The last pic of this series is the stern area.  Note, one of the things that I like about Sam's work is that he designs in plenty of floatation.  The boat is designed to float after capsizing, which comes in handy when one is boating in 15 degree weather which I frequently do during the winter.   

Note the left and right compartments (I guess I should be saying port and starboard at this point).  Those compartments are filled with foam.  I'm from New England therefore I am cheap so I found old dock floatation, cut them up to small blocks and filled the compartments with lots of closed cell foam blocks.  

I'm glad I did the blocks in retrospect because just this year I added another hull-through hose through one of the floatation compartments and all I did was to remove some blocks to make way.  Worked out well.  

Boat starts to take shape...


This is the exciting part... the old workbench is now actual boat pieces... I cut the legs down to about 12" off of the ground and start to put the (4) 16' boat pieces together (the two hull pieces and the two side pieces)... 

This boat is built using the "stitch and glue" method.  It is a fairly new boat building technique... picture taking apart an orange and leaving the peel in one or two pieces... or, If you are in your 40's or older you'll remember the maps of the world in geography class where the world was a poster but it looked like an orange peeled in one piece and then layed flat on the wall... clear as mud?

Well anyway... the two hull pieces are stitched together and the two side pieces are stitched to the two hull pieces using baling wire... holes are cut every 6" or so... closer as the pieces are pulled together to form the boat shape. 

In the pics above, you can see where the wire WAS... at this stage, I took the wires out already after I joined the pieces together with epoxy... I wasn't very disciplined in the photo taking department so you'll have to use your imagination a lot... ; )

"Lofting" is when the designer's plans are layed out onto the wood.


I now have (2) 16' long pieces of 3/8ths " thick plywood to build the hull and the sides of the boat with.   Note the joint where the two 8' pieces of plywood were scarfed together (left of the brick). 

I lofted the hull and side measurements onto one 16' long piece.  I join the two 16' long pieces together (one on top of the other) with clamps, and with help from the bricks, and the cutting begins.  I used a saber saw for most of the cutting, and left about an 1/8th of an inch to spare.  I used a hand planer to shave right to the line.  Many builders us hand planes to shave, but I found it easier to use a hand planer with plywood.

I should also mention at this point that the bricks were my constant helpers.  Whenever I needed a hand to hold things, the bricks were always there.  I didn't have to buy the bricks donuts or give them tips... gotta love the bricks.

Boat will be 16' long... but plywood is only 8'...


I need (2) 16' long pieces of plywood in order to make the hull and the sides... so I employed a technique called "Scarfing".  The plywood is beveled using a hand planer and belt sander... and epoxy is applied to the bevels... two pieces of plywood are joined making (1) long piece.  

Weight (the bricks) are added to the epoxied joint to keep the pieces together during curing.

And finally my assistant is showing the tent that was used to cover the joint as it cured.  It was a cold day and epoxy works best at high temperatures.  I put a light under the blue tarp and that kept it plenty warm until curing.  

The beginning... No garage, so a cabinet-maker friend allowed me to put a tent on his property.


Tent erected, blocks leveled, then a work bench using the marine grade plywood was constructed. 

A link to Sam Devlin's webpage which reveals the Snow Goose specs in case you are interested... the link is underneath the picture.  I should also apologize at this point for my bad HTML blogging skills... I find that developing this blog was far harder than building the boat...


Here is another link to a great site -- www.duckboats.net  

The membership focuses on building duckboats, which the Snow Goose is.  There is an excellent summary of building a duckboat by the site's founder Eric Patterson.  The summary inspired me to build a boat and the folks at this site were with me every step of the way.  Thank you duckboats.net !!!